I always wanted to know how graphics like angry birds, CutTheRope etc are made then i came to know about Inkscape, vector arts. But i want to master few software instead of learning 100s. So i wanted to achieve the same in GIMP.
Except shape editing i find GIMP robust for most of my needs, so i surrendered using Inkscape. I use Inkscape for making shapes mostly. Now GIMP does all my job :).
I have written a simple short tutorial to do smooth gradients often found in vector graphics. This tutorial will give you some simple but powerful tips how to choose colors and opacity to play with smooth color gradients.
Below is the download link of the tutorial in PDF format for offline use:
GIMP_smooth_vector_like_gradients.pdf.7z
Or online version below:


TIP:Always reuse your work if possible. Using color, size variations of images.
GIMP TIP:
To master GIMP one has to become a player in Selection, selection modifications, path, and color selection. Above tutorial has a little demo of this all. Lots of things are there depending upon your needs. But instead of depending too much on filters try to make things yourself otherwise you probably will loose mastering art!
Except shape editing i find GIMP robust for most of my needs, so i surrendered using Inkscape. I use Inkscape for making shapes mostly. Now GIMP does all my job :).
I have written a simple short tutorial to do smooth gradients often found in vector graphics. This tutorial will give you some simple but powerful tips how to choose colors and opacity to play with smooth color gradients.
Below is the download link of the tutorial in PDF format for offline use:
GIMP_smooth_vector_like_gradients.pdf.7z
Or online version below:
Requirements:
- GIMP 2.8 is recommended, otherwise 2.6 if 2.8 is not available.
- Some basic knowledge of PC and graphics terms like alpha, hue, saturation etc
- Basic usage of GIMP or other app with layers.
The only tools and settings we will use most:
- Airbrush tool, opacity & size of brush.
- HSV instead of RGB colors,
Steps:
- Create new project 640x480 or above resolution with transparent background.
- Fill background with dark green color. [ HSV = 124, 99, 63 ]
- Select Airbrush tool with size = 20, opacity = 100, same above green foreground color.
- Select brush blurred circle, size = 51x51, Hardness 075.
- Create new layer and click it to make active work layer.
Things to note:
We have the same green color which will not produce any effect on the background color then why we picked it?
Because we want to use HSV which allows us great color match & closer difference in surrounding colors using Saturation & Value (lightness).
Notations:
H = Hue, S = Saturation, V = Value (lightness), O= Opacity, Sz = Size,
Back to steps:
- Now click the FG color box to change the color of our brush.
- Look at the color formats available: H, S, V, R, G, B. We will always use HSV not RGB because altering RGB values changes colors undesired way.
- Now we can move V slider to change darkness/lightness of a color and S slider to change the color strength. H values for choosing different colors.
- We will select V = 40.
- Now draw an irregular line (L1) in the blank layer. Now set V = 30.
- Use “Fuzzy select tool” and select that irregular line. Click “Menu -> Select -> To Path”.
- Go to path tab near layers tab (dockable layers dialog), enable it with eye button at left. Switch to Layers tab and select path tool.
- Select the path and move it to above-right of the last selected irregular line. Use Move(alt) option in path tool to move path. Click selection from path. Hide path again.
- Now fill this selection with the airbrush. V = 40, O = 50, Sz = 30. The Mouse pointer should be over the top-right border of the selection so that middle of the selection fills lighter green color. Unselect all to remove selection. Now the lines should look like a walking path (L2).


- Now change Brush, V = 75, Sz = 50, O = 100. Draw below L1. Will give output like this -

- Using this method we can make a smooth color gradient just like we get in vector art apps like inkscape. But GIMP gives us much more powerful control.
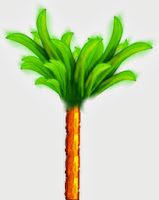
- Below is final output of what i made while writing this tutorial using some objects i made separately. Viz -


The water like thing at bottom of image was just made using MODE of layer color combination not any pen or brush.
You can try it: Make new layer above your green layer, make figures or anything, from mode select saturation, value, dodge etc whichever looks cool to you.
All these gfx were made using the method i described above. You have to play with V, S, O, Sz and brushes, Use Opacity to get lighter color instead of changing V every time.
There are lots of techniques to play with but one good trick of making quick graphics is to make bigger gfx using airbrush tool and downscale it then use pixel editing if desired.
Lets make a simple grass:
- Create a new project 640x480 with transparent background.
- Now create a grass like shape with closed boundaries so that we can fill it with green color.
- Now select the grass shape with Fuzzy select tool and click Menu => Select => Save to channel (keep important selections saved into channels). Get back to the layers tab and create a new layer. Keep selection active!
NOTE:
Always try to keep outlines in separate layer to keep it unaltered and pick selections from them and work on new layers. It means select something in a layer using selection tools and create new layers and do editing on them. This is important so that any editing we do shouldn't spread outside of the boundaries ( the outline ) of our target object and our outlines remain available as it is.
- Now fill this new layer with green color with your choice of SV values .
- Now select Airbrush tool, choose a darker value and apply shade on left of the grass.
- It is important that you shade color in gradient way, means left to right => dark to light. To achieve this try not to change V, just reduce opacity to draw less darker towards right.
- The above shade means grass has some light source at right side. Without shading grass will be plain single color filled paint. Can you image what shade objects have at night/dark? Of course nothing but black, That is why keep smarter shading assuming all light sources including the color mixing due to nearby objects. Suppose a blue orb a left, then apply little blue reflective shading at left to produce more realistic output.
NOTE:
Lots of paintings fail due to bad shading, we should never apply anything without planning. While working always think this in such cases, why i am doing this? Even a single pixel can produce bad shade if added randomly.
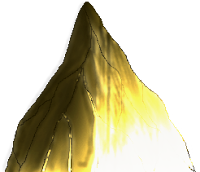
- Now select higher V, means lighter green and apply to right side of grass. Just as done above. Below are the snap of all steps done yet -

- Now select white, but!, in HSV white means V=100, S=0. Apply some white shade randomly where we assume direct light reflection. Adjust opacity to keep white level as per requirements.
- Remove the black outline and your grass is ready.
This result may or may not be up to your expectations. But the shading methods mentioned above will result in your desired one depending upon efforts made.

Impact of nearby objects:
Colors mix together, here Blue + Green = Cyan, therefore to let shading take practical color create new layer and apply shading with the object (blue here). The layout is blue shade layer above and the target object is below (grass here). Click blue shade layer and select MODE to “Addition”. This will add blue with the bottom layer i.e. green to automaticaly produce cyan.

TIP:Always reuse your work if possible. Using color, size variations of images.
- GIMP rocks :) -
GIMP TIP:
To master GIMP one has to become a player in Selection, selection modifications, path, and color selection. Above tutorial has a little demo of this all. Lots of things are there depending upon your needs. But instead of depending too much on filters try to make things yourself otherwise you probably will loose mastering art!


