Showing posts with label Game Development. Show all posts

Tuesday, April 2, 2013

Sprite Frame Designer - animate regions of an Atlas image

I created this app to work with areas/regions of an atlas image to create sprite. This app can let you visualize a sprite sheet by creating frames of desired areas of image. It can export the frames in % size, % position of image. Means resizing image doesn't affect the frame information. However editing positions of framed areas can corrupt the information.

 The package contains a default Sprite sheet i created using my SpriteEditor app.

Tutorial:
1. Open the app by executing "bat" file on Windows, or SH (shell script) file on Linux.
2. Now Open your desired png image with sprites.
3. Select Frame 0, using the Rectangular blinking selection choose your frame area.
4. Create frame 2, do the same.
5. Adjust the animation time by setting value in Delta (ms) field.

The rectangular marker has 2 blinking circles, Left circle moves frame, right circle resizes frame.

You can export the frame information in a text file. This file is specific to the image you opened.

Try the inbuilt animation by executing the app and then opening the walk.conf file from res directory.


Download link:
SpriteFrameDesigner.7z

Software requirements:
1. Linux / BSDs / Windows
2. JRE - java runtime Environment. JDK 5 is used for development.


Example output of frame information in walk.conf present in res directory:
/* start */ 

kull_frames = 4; /* Total frames in walk animation */
Frame_1 = [array] 0.0 0.0 26.171875 93.75 0.0 0.0 100;
Frame_# ...

Frame_4 = [array] 71.09375 0.0 28.125 97.65625 -2.734375 0.0 100;

/* Finish */


Frame_# = [array] X% Y% Width% Height% HotSpotX% HotSpotY% Delta_Milliseconds;

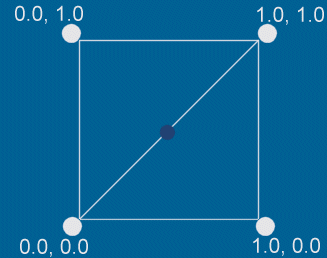
X% = X% of image width. Same for Y%.

Width% = Frame width in % of image width.
Height% = Frame height in % of image height.
HotSpotX,Y = Game Engine dependent thing, ignorable.
Delta = Delta draw time of this frame in milliseconds.

calculated frame pixel positions by example:
Let Image size = 200x100
And Frame_1 is X = 50%, Y = 20%, W = 100%, H = 50%.
X = 100, Y = 20, W = 200, H = 50.  

Search tags:
Sprite sheet visualizer,  sprite sheet area exporter,


Thursday, September 13, 2012

Skeleton Based Sprite Editor

I am finally done with my Skeleton based sprite editor. Almost within 10 days of development my app is ready to use.

Features
  1. It can create skeletons with bones and add image over them.
  2. It can animate the skeletons easily with better motion, just like happens in reality.
  3. Joints behave realistic when moved since the skeletal engine has forward and inverse kinematics implemented.
  4. Made using java, therefore portable on most of operating systems. Tested on Windows & Linux.
  5. Export images of the animations.


Below is a snap of app running in Windows XP.


Limitations / future plannings:
  1. Export of videos. However you can use external snap apps to achieve it.
  2. Documentation, there is no documentation right now, but very soon I'll pack the app with tutorial PDF.
  3. Locked at 30FPS.

Download URL:
SpriteEditor_binary.7z ( version 2013.1.24 )

SpriteEditor.7z ( version 2013.04.02 )


How-to:
To test the app,
1. On Windows: double click the ".bat" file, from Menu click "Open Skeleton For Animation", then select human.skeleton from the res folder of this app from where you executed the bat file. A model will be shown in the screen on right of app window. Go to "Manage Animations" tab. Select any animation e.g. Jump. Click "Work on selected animation", click animate. Use the slider to control  animation speed. Never forget to click "Work on selected animation".

On Linux: execute the shell / .sh file from terminal. Or give executable flag to the sh file from its properties and double click it. The same as above in windows. Please report any bug you find.


If you want more powerful application then head towards Animata:
http://animata.kibu.hu/index.html

This little app is enough to let you achieve complex 2d animation/morphing you desire.


Search TAGs:
Sprite editor skeleton editor sprite maker skeletal animation system skeletal sprite

Saturday, April 28, 2012

Gimp Script for exporting positions of all the layers.

Gimp Script for exporting positions of all the layers.


I have created a Python script which can export layer positions in a text file.

Usability:
Are you using GIMP for creating maps for your game? You want to create a 1024x768 map and put objects in it but cannot export the positions? This script can help you get the positions of your objects.

Procedure:
  1. Run GIMP and create a desired resolution image.
  2. Drag and add your object's images in gimp.
  3. Ensure that you crop the layers so that extra alpha (transparent) areas are not remained in objects.
  4. Duplicate the objects to the numbers you want and place them to positions you want.
  5.  Do same with other objects, backgrounds.
  6. Now export their positions. Filters -> Positioning -> Layers Position Dumper
  7. Put the file name with full path in next dialog. e.g. ~/my_game_map.txt in Linux Or c:\my_game_map.txt in windows. Click Ok.
  8. Now you can check the exported file which contains the positions of all the layers.

How to install the plug-in?
Firstly ensure that you have Python installed in your system. Try to install gimp until you see option of "GIMP python plugin" options checked while installation.

If you haven't installed it please install these packages, This is my installer package: gimp-2.6.11-i686-setup, python-2.5.2.msi

However you can download individual packages by google
gtk-2.12.9-win32-1.exe, pycairo-1.4.12-1.win32-py2.5.exe, pygobject-2.14.1-1.win32-py2.5.exe, pygtk-2.12.1-2.win32-py2.5.exe, python-2.5.2.msi


Or follow this page:
http://www.gimpusers.com/tutorials/install-python-for-gimp-2-6-windows


Install the plugin
Copy the python script to:
WIndows: C:\Documents and Settings\USER\.gimp-2.6\plug-ins
Linux: ~/.gimp-2.6/plug-ins
and restart gimp.

Verify that you have gimp python plugins enabled by following these steps:
Filters -> Python-Fu -> Console

type this:
>>> import gimpfu
>>> gimp.version
(2, 6, 11)


Sample exported file:


Format RATIONAL:
"layer name" X%-Pos Y%-Pos %Width %Height

Format PIXEL:
"layer name" X-Pos Y-Pos Width Height

RATIONAL: "Frame 1.png" 0.000000 0.000000 26.756757 94.634146
PIXEL:    "Frame 1.png" 0.000000 0.000000 99.000000 194.000000

RATIONAL: "Frame 2.png" 26.756757 0.000000 18.918919 99.512195
PIXEL:    "Frame 2.png" 99.000000 0.000000 70.000000 204.000000

RATIONAL: "Frame 3.png" 45.675676 0.000000 25.675676 98.048780
PIXEL:    "Frame 3.png" 169.000000 0.000000 95.000000 201.000000

RATIONAL: "Frame 5.png" 71.351351 0.000000 28.108108 97.073171
PIXEL:    "Frame 5.png" 264.000000 0.000000 104.000000 199.000000

... more dump stripped off


Download:
layer-position-dumper.7z (GIMP v2.6 & 2.8 both )

Raw code:


#!/usr/bin/env python

from gimpfu import *

gettext.install("gimp20-python", gimp.locale_directory, unicode=True)

def layer_position_dumper(img, drawable, filename):
out = file( filename,"w")
out.write( 'Developed by Bindesh Kumar Singh on 26 April 2012\n')
out.write( 'This Plugin is a utility of Greh Game Engine (C) 2009-2012\n')
out.write( 'It dumps the positions of all the layers in a specified text file\n\n')
out.write( 'Format RATIONAL:\n"layer name" X%-Pos Y%-Pos %Width %Height\n\n' )
out.write( 'Format PIXEL:\n"layer name" X-Pos Y-Pos Width Height\n\n\n\n' )
count = 0
w = float( img.width )
h = float( img.height )
for l in img.layers:
if 1 == pdb.gimp_item_is_group( l ):
#print 'group hai'
for gl in l.layers:
x = float( gl.offsets[0] ) * 100.0
y = float( gl.offsets[1] ) * 100.0
lw = float( gl.width ) * 100.0
lh = float( gl.height ) * 100.0
out.write( 'RATIONAL: "%s" %f %f %f %f\n' % ( gl.name, x / w, y / h, lw / w, lh / h ) )
out.write( 'PIXEL:    "%s" %f %f %f %f\n\n' % ( gl.name, gl.offsets[0], gl.offsets[1], gl.width, gl.height ) )
count += 1
else:
#print 'group nahin hai'
x = float( l.offsets[0] ) * 100.0
y = float( l.offsets[1] ) * 100.0
lw = float( l.width ) * 100.0
lh = float( l.height ) * 100.0
out.write( 'RATIONAL: "%s" %f %f %f %f\n' % ( l.name, x / w, y / h, lw / w, lh / h ) )
out.write( 'PIXEL:    "%s" %f %f %f %f\n\n' % ( l.name, l.offsets[0], l.offsets[1], l.width, l.height ) )
count += 1
out.close()


register(
"layer_position_dumper",
"Dump positions of the layers",
"Dumps the offsets/positions of all the layer in a specified file",
"Bindesh Kumar Singh",
"Developed for GrehGameEngine",
"2012",
"_Layers Position Dumper",
"RGB*, GRAY*",
[(PF_IMAGE, "image",       "Input image", None), (PF_DRAWABLE, "drawable", "Input drawable", None), (PF_STRING, "name",       _("_File name with full path"), _("layer_positions.txt"))],
[],
layer_position_dumper,
menu="/Filters/Positioning",
domain=("gimp20-python", gimp.locale_directory)
)

main()


[ 2.8 is currently limited in recursions of groups inside groups. ]

Search tags:
gimp export layer positions, export positions of layers in gim, gimp layer position dumper plugin.

Monday, July 18, 2011

Some very good BIT hacking for programmers,

Today i found this page, looks very useful for all programmers. Many times we need some part of this page:

Link: http://www-graphics.stanford.edu/~seander/bithacks.html

Monday, May 30, 2011

Lots of Linux, OpenSource, games

I was looking for some gimp tutorials and via pics i found this great Linux game collection site, this is a must visit for people demanding games on Linux distros. Below is the link:

http://www.playdeb.net/

Friday, May 20, 2011

A good article on 2D rotated rectangle collisions.

This article is simple, short and easy. Below is the link for the tutorial.

Tutorial - 2D Rotated Rectangles Collision Detection
http://www.ragestorm.net/tutorial?id=22


But in case you don't want to use rotated collision, what i do, is to treat rotated rectangles as a 4 points polygons and do the simple point in polygon Or polygon-polygon test.

Tuesday, January 11, 2011

What are UV / ST texture coordinates and UV mapping ?

I know many of you might be having trouble in understanding what UV/ST are. I too had during beginning of OpenGL texturing. Before eating too much time its just:

(U,V) = (X,Y) of texture.

U = X pixel position of image / image width ;
V = Y pixel position of image / image height ;

And we know how to cap something between 0 to 1 range. Just divide it by the maximum that's why we are dividing pixel position by width and height just to cap it between 0 to 1 range.

Now we do simple maths, multiply U value by 100 and we get pixel position in %age.
suppose U = 0.4 and V = 0.6, it simply means
40% width, and 60% height.

U is pointing to position = 0 + 40% of image width
V is pointing to position = 0 + 60% of image height

That is why texture coordinate system becomes
left = 0 (lowest width), right = 1 (max width)
bottom = 0 (lowest height), top = 1 (max height)


Image Source: = http://paulyg.f2s.com/graphics/uvexp.gif


EDIT:
Now what UV mapping is?
I'll try to explain in lame language.

Assume a triangle as your polygon data and a rectangular, balloon like, nonrigid sheet as texture, here we want to cover the triangle with desired portions of that sheet, what should we do in real world? Of-course we will try to stretch it around triangle in all possible ways,  we can start from wherever we want but limitation is simple, we have got 3 points to staple that sheet. this is exactly what OpenGL does. It asks which part of the texture you want to be mapped into which vertex of polygon. We can't tell OpenGL that hey put this UV in center on the polygon!

That's why the higher the number of vertices we have in polygon the better mapping we can do.

But in actual programming, we can assign almost any UV to any vertex. That would make the triangle with unusual patterns. I haven't tested this :-), try this in 3D modelling programs like Blender if you wanna save your time and experiment quickly on UV mapping. Then export your simple mesh into OBJ format, which you can read on text editors as well.

The best resources for studying OpenGL, OpenGL ES

I learned OpenGL in 2009 and completed my Greh game engine in mid 2010 with my own Game framework for menu, sounds, ai, collision etc.

However i would like to help others in their journey for OpenGL. I strongly recommend reading these resources instead of buying many books. Switching to resources too much without fully giving time to them just wastes time and demoralizes us.:-

1. OpenGL redbook: it's enough for studying OpenGL concepts. Click this link
2. The simplest and nicely described tutorial on OpenGL + shaders (i.e. covers OpenGL ES 2.0 also ).
    Click this link  pointer to http://duriansoftware.com/joe/
3. Nehe (Neon Helium) GL tutorials. Link
4. Going to learn about rendering models, UV mapping etc. Link
5. GLSL, OpenGL ES 2.0. Link
6. Good samples for some of important OpenGL techniques. Link
If you know more links then please let me know.

Friday, December 24, 2010

How to write an emulator?

Well i was just thinking to write a NES emulator since 2008 but that time i could not start due to my game engine. But now after learning these tutorials i must say anyone can make emulators who understands Microprocessors.

Please go through these tutorials to learn emulation. The tutorial is well written, small and very understandable. I will also write tutorials the way i feel simple once i do my NSF player.

Link: http://codeslinger.co.uk/pages/blog/wordpress/

Wednesday, September 1, 2010

Lots of free Gimp Brushes.

Main site:

I am using all those brushes which are royalty free in my artwork and game development.
Please visit these sites and download these nice collection of brushes.

You should visit this site for good collection of gimp brushes and for free.
I love most of brushes. Grab them now:

http://hawksmont.com/blog/category/graphic_design/resources/gimp_brushes/

Thursday, November 19, 2009

Mera 3D model format (similar to wavefront's Obj)

Below is my python script for Blender 3D.

It exports mesh to my custom 3D format m3d(mera 3D, format).


Source download link:
Python script


CPP project source : Cmesh